Wednesday, August 10, 2011

Wall Art

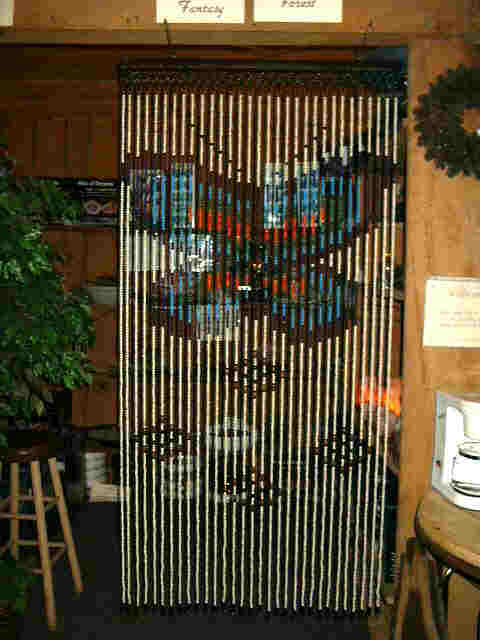
Can u guess what's this Wall Art made out of? Well its a room divider curtain. I had these room divider curtains with me which was gifted  to my mother by her friend and since its was of no use to her she gave it to me and yes it was of no use to me too but the way i used it now i feel its worth it.

First i measured how many piece will i require in a row on the wall  and i needed 7 piece each in a row. Than i took my husbands fishing line :) and tied 7 piece in a row.

After i was done done joining all of them i nailed the top first piece to the wall leaving a gap in between each row and my wall art was ready...;) loved the way it looked.


Tuesday, August 9, 2011

Beaded Curtains


Beads are decorative and are used for various types of artwork and also used in different home decorative products. Bead curtains are used for door and window treatments and as room dividers too.Beads curtains comes in  different sizes, colors and varieties like pearl, wood, mirror, crystal, shells and hundreds of choices.


Beaded Curtains as Room Divider:


I Love these capiz shell curtains..how about making a faux capiz shell curtains...;) 
Beaded curtains are not only used for home decor but now days its kind of a trend to use for wedding ceremony decor and other ceremony too.


Can be used in your bedroom.

And as your shower curtain too.

Tuesday, August 2, 2011

Cardstock SunBurst Mirror

Made this Sunburst Mirror out of card stock.Previously i made a sunburst mirror but this time i wanted to make something different for the bedroom so i check for some blogs and found this one on
http://thearielroseblog.wordpress.com i loved the way it looked and it was something that i was searching for something different. You will find the instruction for this project on the above given link.

SunBurst Mirror

Made this sunburst mirror out of Sushi mate. Had an old sushi mat which i thought would be perfect to make this. In fact I had two different kinds of mat luckily the one with thinner cylindrical bamboo sticks and another with flat and wider bamboo sticks. So I used the flats one to give a long effect and the cylindrical to give short effect.
1.I Untied the sushi mat and wiped them well.

2. I dint had to cut the flat bamboo stick as they were perfect in size for the mirror. But the cylindrical bamboo stick I cut it little shorter than the flat ones all in equal size.
3. I spray painted the flat bamboo stick in black
and cylindrical bamboo stick in gold.
4. By the time the paint would dry i took the mirror and started marking on the behind of the mirror with a measuring tape 1/2 cm below the edge of the mirror and 1/2 cm apart as it would be easy for me while gluing the sticks on the mirror.(check the image below)
 
 5. Once the sticks were dried i started gluing the sticks to the mirror using a hot glue gun. I first started with the black sticks and once that was done i started gluing the gold sticks in between the black sticks.And the result is seen below.


Wednesday, July 27, 2011

Table Centerpiece

Another DIY project featured on BHG.


Here's what you'll need to create this simple and sweet centerpiece: a foam cube, clear glass holiday bulb ornament, decorative packing tape.

    Using a spoon, hollow out a crater in the foam cube. The hole should be just large enough to nestle the clear glass bulb. Wrap the foam cube with decorative tape. Then simply fill half the bulb with water and poke your favorite cut flowers inside. Try lining three centerpieces along your dining table or mantel.

Tuesday, July 26, 2011

Cupcake Wrappers Wall Art

Sweet Success - This was featured on www.bhg.com. Its easy and amazing.

    Cupcake wrappers become funky abstract art. Here's how: Look for a rippled plastic sheet used for industrial lighting covers. Use a large ruler and a crafts knife to cut the plastic sheet into four equal-size squares. Set the squares on a flat surface or floor. Arrange your cupcake liners on top--the more random the pattern, the better.

Copper Wire Bonsai

If you are fond of Bonsai but too lazy to take care of it than you should try this out.I made this Bonsai out of copper wire and plastic fibers of a Christmas pine tree leaf.

 First Cut the copper wire in all equal sizes you can chose whatever size you like the longer the better to shape and twist.
I used the plastic fiber of a Christmas pine tree leaf which I had as I wanted a natural look. You can use beads, shells, etc.
Untwist the pine leaf to remove the plastic fiber and place it between the copper wire and twist it on top to secure it to the wire. I made some big size twigs too. For the big size twig just bend the top of the wire and place the fiber in-between and twist.
I joined 4 twigs together, 3 twigs together as it would be easy for me to twist later. You can now start joining all the twigs together and twist them and make the desired shape you require. For the base i used a rock which i had. For the roots divide the wire in 4 or 5 parts and twist them. I think the more the roots the more realistic it looks.
Your Bonsai is ready.

Sunday, July 24, 2011

Paper Rose


1. Cut your paper into 7x7cm square and draw a spiral on it.
2. Cut out the spiral along the lines you have drawn.
3.Begin rolling out the spiral from outside.
4. Keep on rolling till you reach the end and later glue the end and your done with the rose.
 I had a twig which i spray painted in silver and made some more rose's and glued them on it.
For the vase i used a left over glass of a scented candle and decorative jar filler.
And this is what it looked like...:)